Knowledge in one place.
By Leonardo Lopes – Applications Engineer
At Blog Datacom, we are always looking to offer resources that facilitate network management for our customers and professionals in the telecommunications sector. In addition to offering DmView, a complete solution for network management that supports the entire line of Datacom equipment with features such as CLI templates, TR-069 templates, end-to-end configuration and provisioning, Datacom also integrates its equipment and solutions with several market tools, including several open source ones. In this article, we will cover an extremely interesting tool that can complement the management of your network assets: NetBox.
Introduction to NetBox
NetBox is recognized as the leading solution for modeling and documenting modern networks. Combining IP address management (IPAM) and data center infrastructure management (DCIM) with robust APIs, NetBox serves as the “source of truth” for powering network automation. This article highlights the main characteristics of NetBox, emphasizing its importance in the efficient management of telecommunications and internet infrastructures.
NetBox Capabilities
NetBox is an open, powerful and flexible tool designed to serve several purposes:
Limitations of NetBox – What Netbox is not:
While comprehensive, NetBox does not support:
Design and Functionality
The NetBox design aims to replicate and model the desired state versus the operational state of a network, requiring all data to be verified by a responsible technician to ensure its accuracy. Developed in Python and using PostgreSQL as a database, NetBox adapts to any platform compatible with these technologies. Installation may vary depending on use, but it is crucial that Python and PostgreSQL are correctly configured. Administrators can also monitor and adjust system performance to optimize response according to the needs of the environment.
Flexibility and Accessibility
As free and open source software, NetBox allows use and customization at no additional cost. Many manufacturers provide ready-made templates that facilitate the implementation and integration of NetBox into existing infrastructures, simplifying the configuration process and accelerating its adoption.
Integration of NetBox with Datacom Equipment
Datacom provides a library of devices, modules and images, offering specific templates that can be integrated into NetBox to further simplify the management of these devices. The following link provides a library of device types for Datacom equipment that can be used in NetBox: https://github.com/netbox-community/devicetype-library/tree/master/device-types/Datacom.
The DATACOM device library includes device types for the following equipment:
To use this library, you need to download the code and import it into NetBox. After importing the Datacom device templates, you can create Datacom devices on the platform. On the "Devices" page, click the "Create" button and, in the "Create Device" dialog box, select the "Datacom" device type and fill in the necessary fields. In addition, the library also includes templates for modules:
The DATACOM equipment module templates are available at the following link: https://github.com/netbox-community/devicetype-library/tree/master/module-types/Datacom.
Modules are individual components that can be installed on a DATACOM device.
In addition to the library of device and module types, the DATACOM repository also includes images of the equipment. Images can be used to add a visual representation of devices.
Images of DATACOM equipment are available at the following link: https://github.com/netbox-community/devicetype-library/tree/master/elevation-images/Datacom.
NetBox stands out not only for its adaptability to networks of varying sizes, but also for its remarkable scalability, facilitating a fluid transition as organizations expand. With an intuitive interface, NetBox significantly simplifies network infrastructure management and offers a smooth learning curve, consolidating itself as a robust and user-friendly tool. Additionally, its effective integration with Datacom equipment highlights its value, making it an especially advantageous option for ISPs using these devices. See below examples of how to export templates.
Exporting Templates
Access the “Device Types” page.
Click the "Import" button.
Click the "Upload File" button.
Choose the template
Click on the "Submit" button.
Adding Equipment
>> Adding a region
Access the “Regions” page.
Click the "Add" button.
In the "Name" dialog box, enter the name of the region.
Click the "Create" button.
Now add the “child” regions to this region
Access the “Regions” page.
Click the "Add" button.
In the "Parent" dialog box, select the parent region.
In the "Name" dialog box, enter the name of the region.
Click the "Create" button.
>> Adding a site group.
Access the "Site Groups" page.
Click the "Add" button.
In the "Add a new site group" dialog box, enter the following information:
Name: The name of the group.
Click the "Create" button.
>> Adding a website
Access the "Sites" page.
Click the "Add" button.
In the "Add a new site" dialog box, enter the following information:
Name: The name of the site.
Region: Select the created region.
Group: Select the created Group.
Time Zone: America/São Paulo
Physical address: The website address.
Click the "Create" button.
>> Adding a location to your website
Access the "Locations" page.
Click the "Add" button.
In the "Add a new location" dialog box, enter the following information:
Region: Select the created region.
Site Group: Select the created group.
Website: Select the created website.
Name: The name of the location.
Click the "Create" button.
>> Adding rules to racks
Access the "Rack Roles" page.
Click the "Add" button.
In the "Add a new rack role" dialog box, enter the following information:
Name: The name of the rule.
Color: A color to identify the rule.
Click the "Create" button.
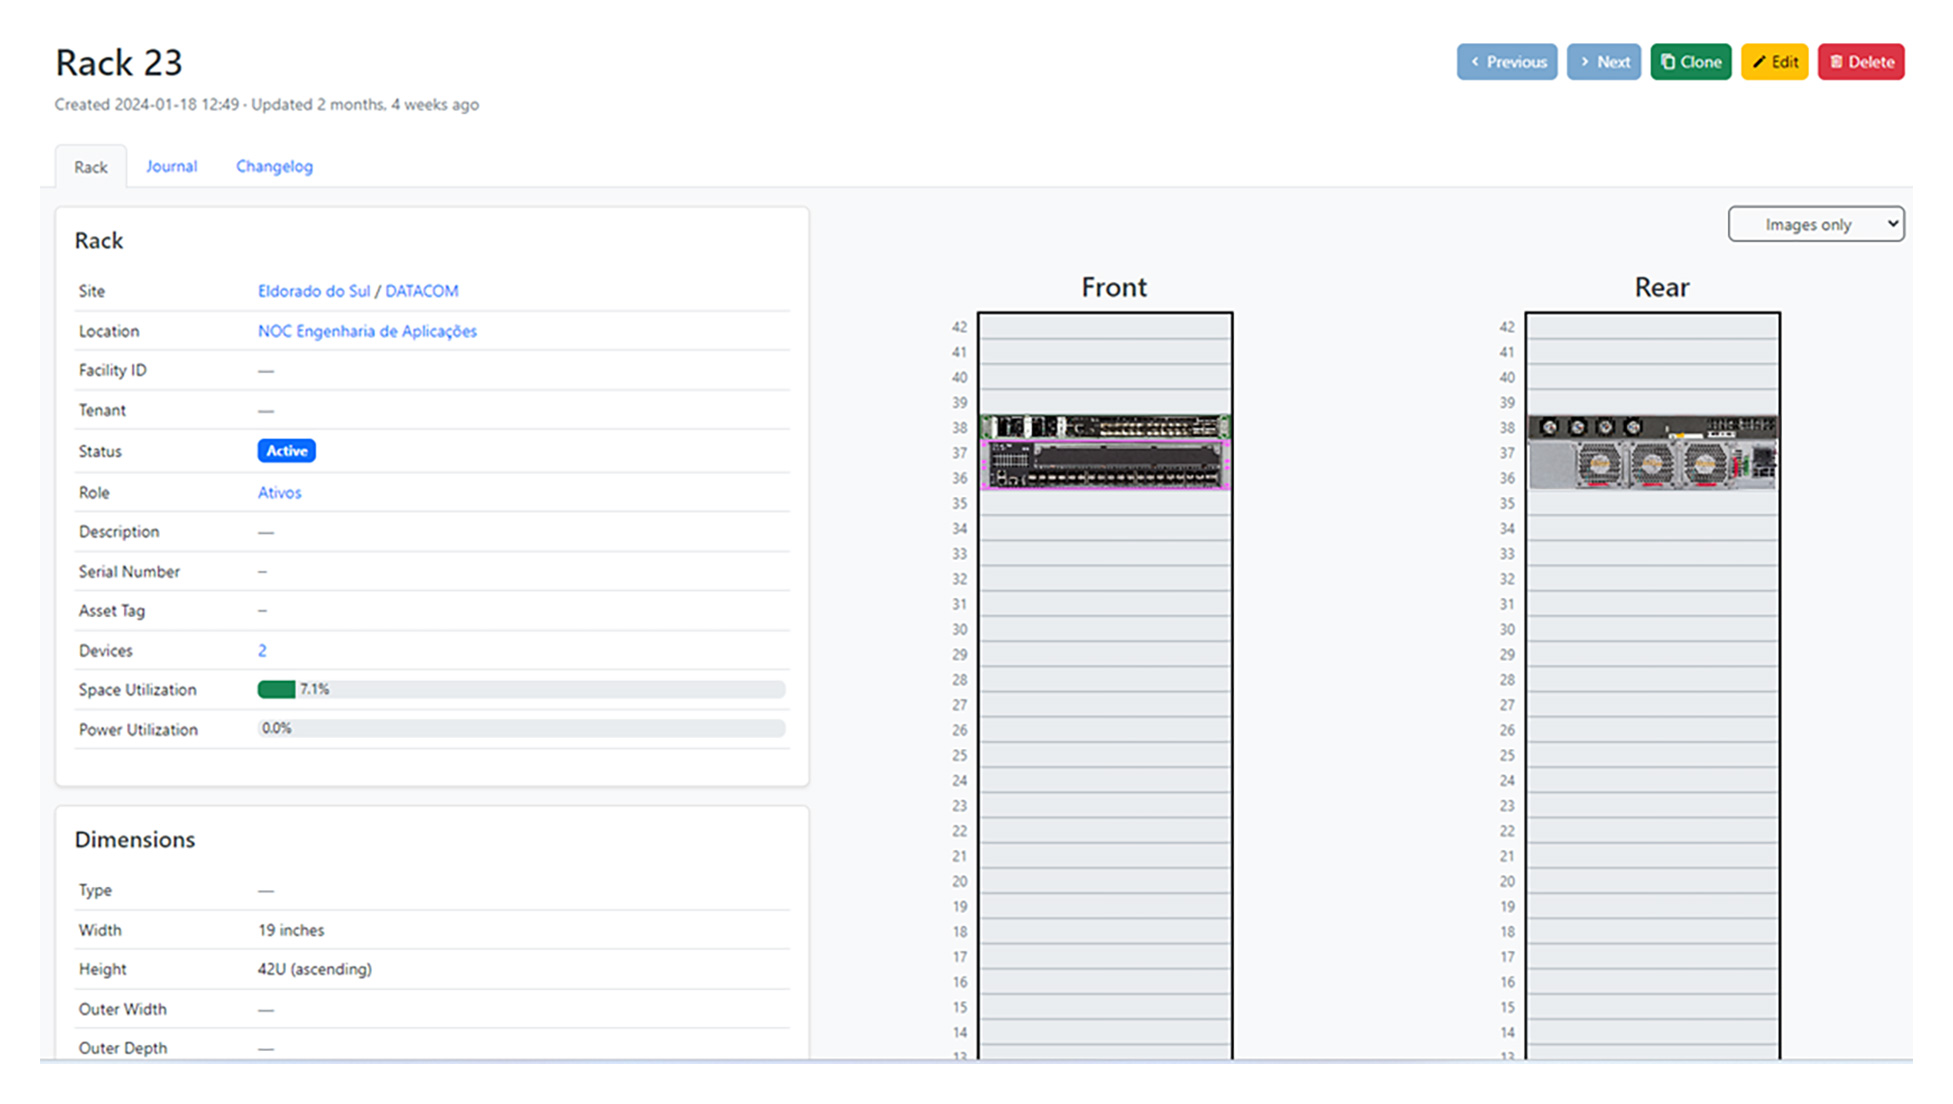
>> Adding a Rack
Access the "Racks" page.
Click the "Add" button.
In the "Add a new rack" dialog box, enter the following information:
Region: Select the created region.
Site Group: Select the created group.
Website: Select the created website.
Location: The created location.
Name: The name of the Rack.
Height (U): Rack height in rack unit (U).
Click the "Create" button.
>> Adding a rule for devices
Access the "Device Roles" page.
Click the "Add" button.
In the "Add a new device role" dialog box, enter the following information:
Name: The name of the rule.
Color: A color to identify the rule.
Click the "Create" button.
>> Adding an Equipment
Access the "Device" page.
Click the "Add" button.
In the "Add a new device" dialog box, enter the following information:
Name: The name of the device.
Device Role: Rule for the device.
Manufacturer: DATACOM.
Device type: The device model.
Airflow: Air outlet from the device.
Serial number: The serial number.
Region: Select the created region.
Site Group: Select the created group.
Website: Select the created website.
Location: The created location.
Rack: The Rack created.
Rack Face: Side where the device will be.
Position: Position of the device in the Rack in rack unit (U).
Click the "Create" button.
Back to blog
